How to Set Up Nextcloud AIO with Caddy: A Super Easy Self-Hosting Guide
Introduction
Self-hosting your own cloud storage is easier than ever, thanks to Nextcloud AIO (All-in-One). In this tutorial, I'll walk you through a simple, step-by-step setup using Docker and Caddy as a reverse proxy.
Why Nextcloud AIO?
- All-in-One installation—Nextcloud, MariaDB, Redis, and Collabora in one place.
- Automatic HTTPS via Caddy—No manual SSL configuration needed.
- Runs in Docker—No need to install dependencies manually.
By the end of this guide, you'll have a fully functional Nextcloud instance running on your own domain with secure HTTPS.
Step 1: Server Setup
Make sure you've got:
- A VPS running Debian 12 (for the purposes of this tutorial)
- A domain name (pointed to your server)
- Basic Linux command-line skills
Update your server
system("sudo apt update && sudo apt upgrade -y")Install Docker & Docker Compose
system("sudo apt install -y docker docker-compose")
system("sudo systemctl enable --now docker")
Install and enable Caddy
system("sudo apt install -y caddy")
system("sudo systemctl enable --now caddy")
At this point, Docker and Caddy are installed and ready to go.
Step 2: Set Up Caddy (Reverse Proxy)
Caddy will act as the reverse proxy, handling HTTPS and routing traffic to the Nextcloud container. In this step we will add the domain and container IP address to the Caddy File.
Open the Caddyfile:
system("sudo nano /etc/caddy/Caddyfile")Replace its contents (make sure to change 11,000 to the port that the Nextcloud container is listening on):
mydomain.com {
    reverse_proxy 127.0.0.1:11000
}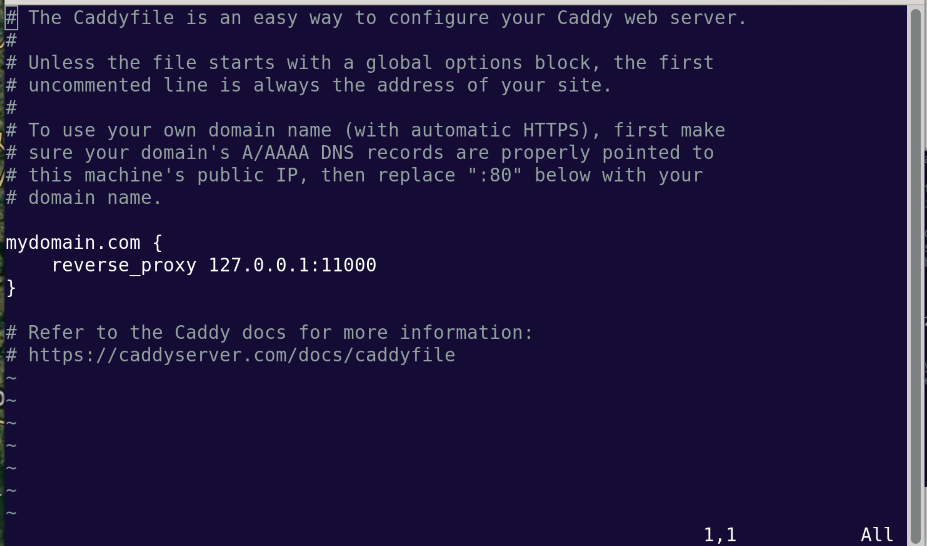
You can find the correct container port by running docker ps if you're not sure which one is being used.
Save and exit, then restart Caddy:
system("sudo systemctl restart caddy")vu
Caddy is now set up to handle HTTPS and route traffic to the Nextcloud container.
Step 3: Deploy Nextcloud AIO
Now that the server is ready, let's install Nextcloud AIO inside the Docker container.
First, run the Nextcloud AIO Container and then complete the Web Setup.
system("docker run -it --init --rm \
    --name nextcloud-aio-mastercontainer \
    --volume nextcloud_aio_mastercontainer:/mnt/docker-aio-config \
    --volume /var/run/docker.sock:/var/run/docker.sock:ro \
    -p 8080:8080 \
    nextcloud/all-in-one:latest")
Once the container is running, open your browser and go to: https://mydomain.com:8080
Follow the Nextcloud AIO setup wizard: Enter your domain name, Disable built-in Caddy (since we are using our own), Enable Redis, Collabora (Nextcloud Office), and Imaginary, Set the correct timezone => Click Install!
This process will take a few minutes while Nextcloud downloads all required components.
Step 4: Final Checks & Next Steps
Once the installation completes, go to: https://mydomain.com Enter the admin credentials provided by the AIO setup.
Then make sure to test file uploads & OnlyOffice:
- Upload some files and verify that syncing works.
- Open a document using Nextcloud Office (Collabora).
Step 5: Sync Devices
- Install the Nextcloud Sync app on your phone and computer.
- Connect using your domain and admin credentials.
Conclusion
That’s it! You now have a fully functional, self-hosted Nextcloud server that contains: Secure HTTPS with Caddy, Nextcloud running in Docker and Collabora (Nextcloud Office) for document editing.
I went with this setup after trying a few different methods. It’s the smoothest, cleanest option I’ve found, especially if you want to avoid messing with SSL certificates. I recommend downloading the iOS app on your phone for easy document transfer between phone and computer.
Let me know if you try this setup, I’d love what works for you!